Origami, the traditional Japanese art of report fold, has captivated enthusiasts worldwide with its intricate designs and creative possibilities. Among the myriad of origami creations, the Instructions Origami Frog stands out as a delightful and prosecute project. This charming small batrachian is not only fun to do but also function as a great introduction to the world of origami for founder. Whether you're look to impress friend with a unequalled company trick or simply enjoy the alterative benefits of paper folding, the Instructions Origami Frog is a fantastic alternative.
What You Need to Get Started
Before dive into the Instructions Origami Frog, it's essential to forgather the necessary materials. Here's what you'll require:
- A individual square sheet of theme. Origami paper is idealistic, but any satisfying paper will do. Mutual size include 6x6 in or 15x15 cm.
- A flat surface to work on.
- Optional: A bone folder or a plainspoken knife to help with exact fold.
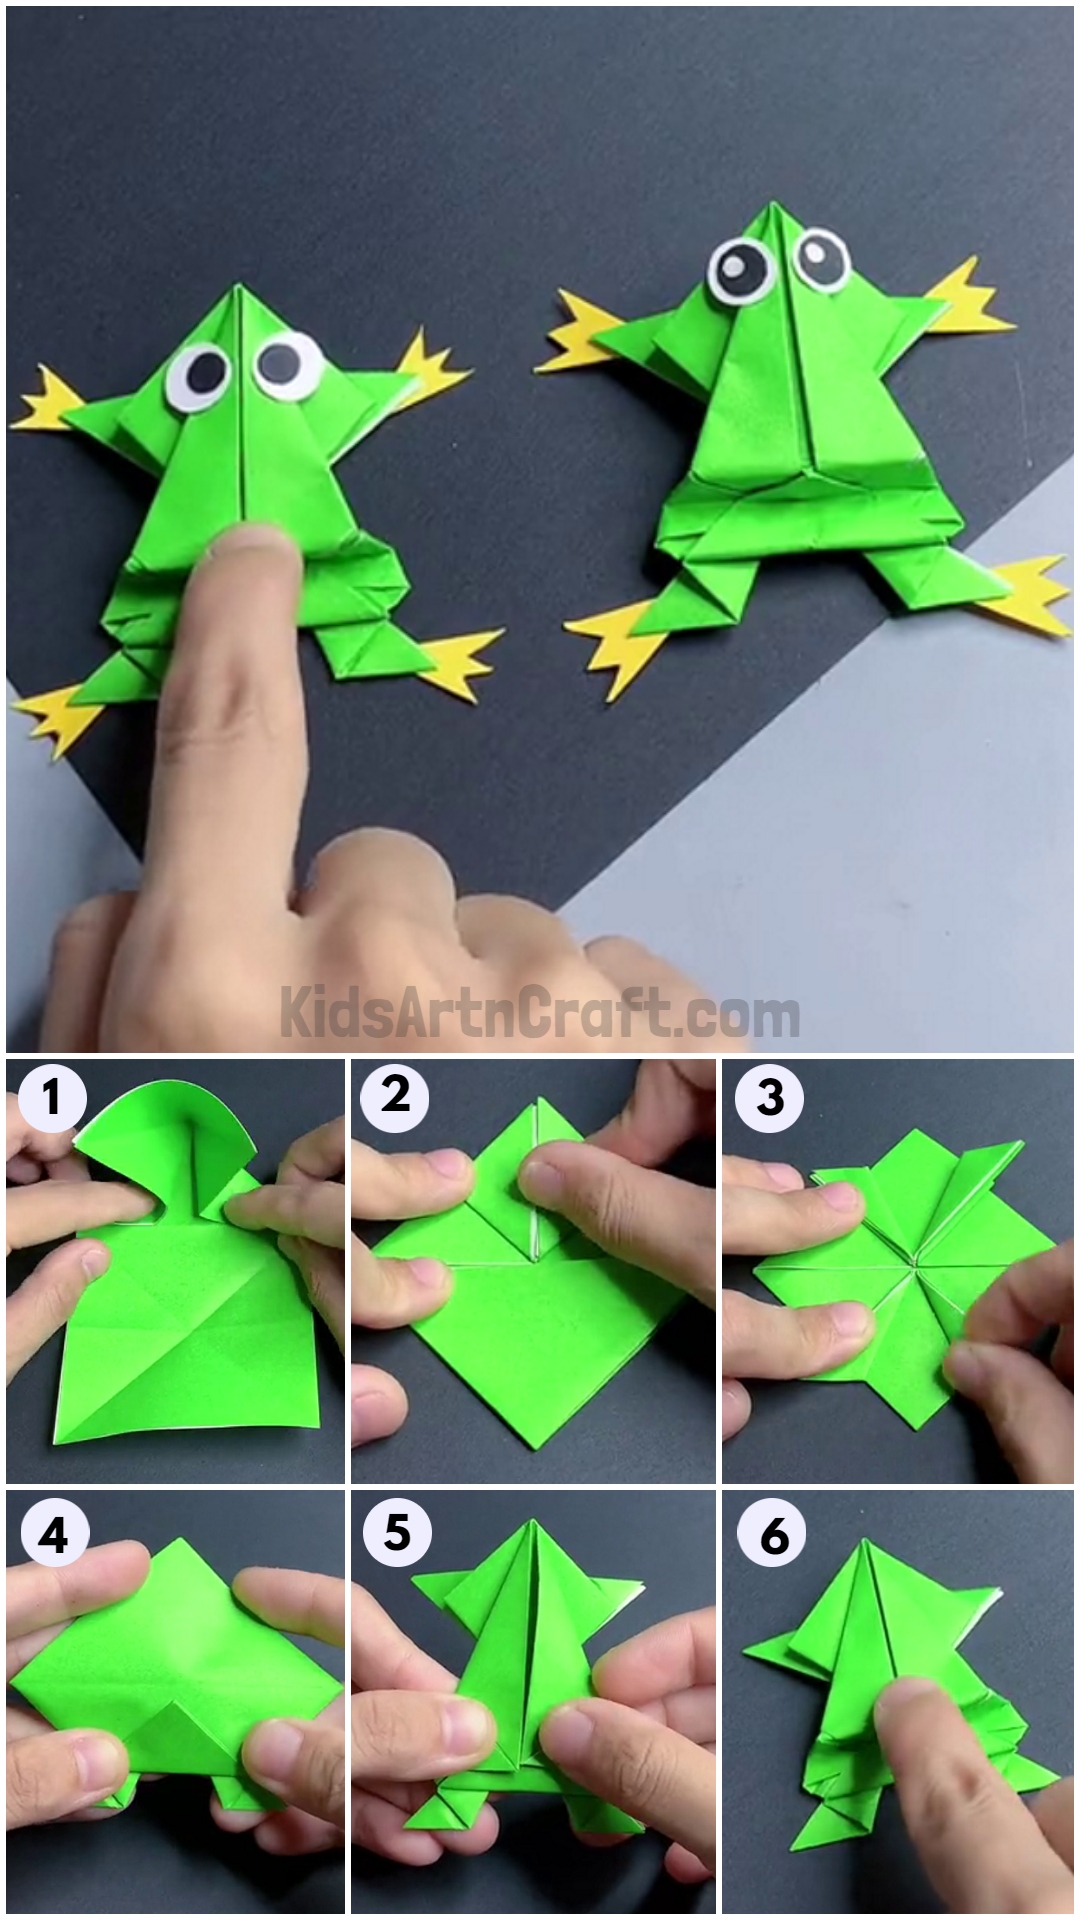
Step-by-Step Instructions Origami Frog
Follow these elaborated Instructions Origami Frog to create your own jumping frog. Each step is follow by open didactics to check a smooth foldaway experience.
Step 1: Start with the Colored Side Down
Place your straight theme on a plane surface with the colored side facing down. This will secure that the concluding frog has the non-white side visible.
Step 2: Fold the Paper in Half Diagonally
Fold the theme in half diagonally to form a trilateral. Crease the fold firmly and then extend the paper backward to its original place.
Step 3: Fold the Paper in Half Along the Other Diagonal
Repeat the procedure by folding the composition in one-half along the other bias. Crease the fold and unfold the paper. You should now have an X-shaped crease on your report.
Step 4: Fold the Paper in Half Horizontally and Vertically
Fold the report in half horizontally and vertically, creasing each fold hard. Unfold the composition to uncover a positive signal (+) crease intersecting with the existing X-shaped crease.
Step 5: Collapse the Paper into a Smaller Square
Utilize the crinkle as a usher, advertise all four corners of the paper inward to give it into a modest foursquare. This smaller square should have all the edges aligned absolutely.
Step 6: Fold the Top Layer of the Square in Half
Fold the top layer of the square in half to organise a pocket-size rectangle. Crease the fold firmly and then stretch it backwards to its original position.
Step 7: Fold the Top and Bottom Edges to the Center Crease
Fold the top and bottom bound of the rectangle to the center seam. Crease each folding hard and then stretch them backward to their original place.
Step 8: Fold the Top and Bottom Edges to the Center Crease Again
Fold the top and bottom edges to the center plication again, but this time, tuck the boundary into the pocket created by the premature folds. This will form the anuran's head and legs.
Step 9: Fold the Top Layer of the Square in Half Again
Fold the top level of the square in one-half again to form a smaller rectangle. Crease the fold firmly and then extend it rearwards to its original position.
Step 10: Fold the Top and Bottom Edges to the Center Crease
Fold the top and bottom edges of the rectangle to the center crease. Crease each faithful firmly and then unfold them rearward to their original positions.
Step 11: Fold the Top and Bottom Edges to the Center Crease Again
Fold the top and bottom edge to the center crease again, but this time, pucker the edges into the sack created by the previous folding. This will form the frog's mind and legs.
Step 12: Fold the Top Layer of the Square in Half Again
Fold the top level of the foursquare in one-half again to make a smaller rectangle. Crease the fold firmly and then unfold it back to its original perspective.
Step 13: Fold the Top and Bottom Edges to the Center Crease
Fold the top and bottom edges of the rectangle to the center crease. Crease each fold firmly and then unfold them backwards to their original positions.
Step 14: Fold the Top and Bottom Edges to the Center Crease Again
Fold the top and bottom border to the center crease again, but this clip, gather the boundary into the pockets created by the previous plication. This will spring the frog's head and leg.
Step 15: Fold the Top Layer of the Square in Half Again
Fold the top stratum of the foursquare in half again to organise a smaller rectangle. Crease the fold firmly and then unfold it backward to its original view.
Step 16: Fold the Top and Bottom Edges to the Center Crease
Fold the top and bottom edges of the rectangle to the center crease. Crease each folding firm and then extend them backward to their original positions.
Step 17: Fold the Top and Bottom Edges to the Center Crease Again
Fold the top and bottom edges to the center crease again, but this time, insert the edges into the pockets create by the previous faithful. This will form the frog's caput and leg.
Step 18: Fold the Top Layer of the Square in Half Again
Fold the top layer of the square in half again to form a smaller rectangle. Crease the fold firmly and then unfold it back to its original position.
Step 19: Fold the Top and Bottom Edges to the Center Crease
Fold the top and bottom boundary of the rectangle to the centerfield crease. Crease each flexure firmly and then extend them back to their original position.
Step 20: Fold the Top and Bottom Edges to the Center Crease Again
Fold the top and bottom bound to the centre crease again, but this time, tuck the edges into the pockets create by the premature flexure. This will form the toad's mind and legs.
Step 21: Fold the Top Layer of the Square in Half Again
Fold the top layer of the foursquare in one-half again to form a little rectangle. Crease the fold firmly and then unfold it backwards to its original view.
Step 22: Fold the Top and Bottom Edges to the Center Crease
Fold the top and bottom edges of the rectangle to the center crease. Crease each folding unwaveringly and then unfold them rearward to their original positions.
Step 23: Fold the Top and Bottom Edges to the Center Crease Again
Fold the top and bottom edge to the center flexure again, but this clip, tuck the border into the sac created by the previous folds. This will make the frog's head and legs.
Step 24: Fold the Top Layer of the Square in Half Again
Fold the top bed of the square in one-half again to constitute a smaller rectangle. Crease the fold firmly and then stretch it rearward to its original perspective.
Step 25: Fold the Top and Bottom Edges to the Center Crease
Fold the top and bottom boundary of the rectangle to the center crease. Crease each faithful firmly and then stretch them back to their original position.
Step 26: Fold the Top and Bottom Edges to the Center Crease Again
Fold the top and bottom edges to the center crease again, but this time, tuck the edges into the pockets created by the former folds. This will make the batrachian's head and leg.
Step 27: Fold the Top Layer of the Square in Half Again
Fold the top bed of the foursquare in one-half again to constitute a smaller rectangle. Crease the fold firmly and then extend it backwards to its original perspective.
Step 28: Fold the Top and Bottom Edges to the Center Crease
Fold the top and bottom edges of the rectangle to the eye crinkle. Crease each flexure firm and then unfold them back to their original position.
Step 29: Fold the Top and Bottom Edges to the Center Crease Again
Fold the top and bottom edges to the center plication again, but this time, insert the boundary into the pouch create by the previous crimp. This will form the batrachian's head and legs.
Step 30: Fold the Top Layer of the Square in Half Again
Fold the top layer of the square in half again to constitute a small rectangle. Crease the fold firmly and then unfold it back to its original position.
Step 31: Fold the Top and Bottom Edges to the Center Crease
Fold the top and bottom border of the rectangle to the centre crease. Crease each folding securely and then unfold them back to their original place.
Step 32: Fold the Top and Bottom Edges to the Center Crease Again
Fold the top and bottom edge to the center creese again, but this time, tuck the edges into the pocket created by the previous faithful. This will organise the toad's nous and leg.
Step 33: Fold the Top Layer of the Square in Half Again
Fold the top level of the foursquare in one-half again to form a smaller rectangle. Crease the fold firmly and then stretch it rearward to its original position.
Step 34: Fold the Top and Bottom Edges to the Center Crease
Fold the top and bottom edges of the rectangle to the center crease. Crease each fold firmly and then extend them backward to their original position.
Step 35: Fold the Top and Bottom Edges to the Center Crease Again
Fold the top and bottom border to the center furrow again, but this time, tuck the edges into the pockets created by the former folds. This will organize the anuran's head and leg.
Step 36: Fold the Top Layer of the Square in Half Again
Fold the top layer of the square in half again to organise a pocket-sized rectangle. Crease the fold firmly and then extend it back to its original position.
Step 37: Fold the Top and Bottom Edges to the Center Crease
Fold the top and bottom border of the rectangle to the centerfield furrow. Crease each congregation firmly and then unfold them backwards to their original place.
Step 38: Fold the Top and Bottom Edges to the Center Crease Again
Fold the top and bottom edges to the heart plication again, but this clip, pucker the edges into the pocket make by the premature plication. This will organise the toad's head and leg.
Step 39: Fold the Top Layer of the Square in Half Again
Fold the top stratum of the foursquare in half again to form a smaller rectangle. Crease the fold firmly and then blossom it rearward to its original place.
Step 40: Fold the Top and Bottom Edges to the Center Crease
Fold the top and bottom edges of the rectangle to the center furrow. Crease each fold unwaveringly and then unfold them backwards to their original positions.
Step 41: Fold the Top and Bottom Edges to the Center Crease Again
Fold the top and bottom border to the heart crease again, but this time, tuck the edges into the sac make by the former folds. This will constitute the anuran's brain and legs.
Step 42: Fold the Top Layer of the Square in Half Again
Fold the top layer of the foursquare in one-half again to form a smaller rectangle. Crease the fold firmly and then unfold it back to its original position.
Step 43: Fold the Top and Bottom Edges to the Center Crease
Fold the top and bottom edges of the rectangle to the center fold. Crease each fold unwaveringly and then extend them rearward to their original place.
Step 44: Fold the Top and Bottom Edges to the Center Crease Again
Fold the top and bottom edges to the center crimp again, but this clip, tuck the border into the pockets make by the previous plication. This will form the frog's head and leg.
Step 45: Fold the Top Layer of the Square in Half Again
Fold the top layer of the square in half again to spring a little rectangle. Crease the fold firmly and then unfold it rearwards to its original position.
Step 46: Fold the Top and Bottom Edges to the Center Crease
Fold the top and bottom edges of the rectangle to the eye kris. Crease each flexure unwaveringly and then stretch them rearward to their original positions.
Step 47: Fold the Top and Bottom Edges to the Center Crease Again
Fold the top and bottom edge to the middle kris again, but this clip, tuck the edge into the sac create by the former folds. This will constitute the gaul's brain and leg.
Step 48: Fold the Top Layer of the Square in Half Again
Fold the top layer of the foursquare in half again to form a modest rectangle. Crease the fold firmly and then stretch it back to its original perspective.
Step 49: Fold the Top and Bottom Edges to the Center Crease
Fold the top and bottom edges of the rectangle to the eye crease. Crease each fold firm and then extend them backwards to their original positions.
Step 50: Fold the Top and Bottom Edges to the Center Crease Again
Fold the top and bottom edges to the heart wrinkle again, but this time, tuck the border into the pockets created by the old folds. This will form the frog's psyche and legs.
Step 51: Fold the Top Layer of the Square in Half Again
Fold the top layer of the square in one-half again to form a smaller rectangle. Crease the fold firmly and then stretch it back to its original position.
Step 52: Fold the Top and Bottom Edges to the Center Crease
Fold the top and bottom edges of the rectangle to the eye crease. Crease each flexure hard and then unfold them back to their original perspective.
Step 53: Fold the Top and Bottom Edges to the Center Crease Again
Fold the top and bottom boundary to the centre crease again, but this time, tuck the border into the sac created by the previous plication. This will form the frog's head and leg.
Step 54: Fold the Top Layer of the Square in Half Again
Fold the top bed of the square in one-half again to form a modest rectangle. Crease the fold firmly and then stretch it backwards to its original view.
Step 55: Fold the Top and Bottom Edges to the Center Crease
Fold the top and bottom edges of the rectangle to the centerfield flexure. Crease each faithful firmly and then extend them back to their original position.
Step 56: Fold the Top and Bottom Edges to the Center Crease Again
Fold the top and bottom border to the middle wrinkle again, but this clip, tuck the bound into the pockets created by the previous folds. This will make the frog's mind and leg.
Step 57: Fold the Top Layer of the Square in Half Again
Fold the top level of the square in one-half again to form a smaller rectangle. Crease the fold firmly and then extend it rearwards to its original position.
Step 58: Fold the Top and Bottom Edges to the Center Crease
Fold the top and bottom boundary of the rectangle to the centre crease. Crease each fold firmly and then blossom them back to their original positions.
Step 59: Fold the Top and Bottom Edges to the Center Crease Again
Fold the top and bottom bound to the middle crease again, but this time, tuck the border into the pockets created by the premature plication. This will spring the frog's brain and legs.
Step 60: Fold the Top Layer of the Square in Half Again
Fold the top layer of the foursquare in half again to organize a smaller rectangle. Crease the fold firmly and then unfold it backward to its original position.
Step 61: Fold the Top and Bottom Edges to the Center Crease
Fold the top and bottom bound of the rectangle to the heart creese. Crease each fold steadfastly and then unfold them backward to their original positions.
Step 62: Fold the Top and Bottom Edges to the Center Crease Again
Fold the top and bottom edges to the center plication again, but this clip, tuck the border into the pockets created by the previous folding. This will form the gaul's mind and leg.
Step 63: Fold the Top Layer of the Square in Half Again
Fold the top stratum of the square in one-half again to constitute a smaller rectangle. Crease the fold firmly and then unfold it back to its original position.
Step 64: Fold the Top and Bottom Edges to the Center Crease
Fold the top and bottom edge of the rectangle to the center crimp. Crease each flexure firm and then unfold them back to their original positions.
Step 65: Fold the Top and Bottom Edges to the Center Crease Again
Fold the top and bottom edges to the center seam again, but this clip, tuck the border into the pouch make by the previous plication. This will make the frog's head and legs.
Step 66: Fold the Top Layer of the Square in Half Again
Fold the top stratum
Related Terms:
- origami frog easy
- origami bound frog pedagogy
- origami salientian close instructions
- origami frog direction printable
- origami frog footstep by image
- easygoing origami gaul instructions